[Viet] Cảnh Báo Về Botnet Meris Và Cách Bảo Vệ Router Mikrotik

Gần đây, có một số trường hợp được báo cáo về việc router Mikrotik bị xâm nhập và trở thành một phần của botnet Meris. Botnet Meris đã trở thành một điều trở ngại đáng kể trong cộng đồng mạng, đặc biệt là đối với những người sử dụng thiết bị MikroTik. Trong bài viết này, chúng ta sẽ khám phá chi tiết về botnet Meris, nguyên nhân tạo ra vấn đề này đối với router MikroTik, và cách thức để bảo vệ thiết bị khỏi các mối đe dọa tương tự trong tương lai.

1. Hiểu biết cơ bản về Botnet Meris:

Botnet Meris là một mạng lưới các thiết bị bị xâm nhập được điều khiển từ xa bởi các tác nhân độc hại. Botnet này đã được sử dụng để tiến hành các cuộc tấn công DDoS lớn, gây ảnh hưởng đến nhiều trang web và dịch vụ trực tuyến khác nhau. Một đặc điểm đáng lưu ý của botnet Meris là sự sử dụng các thiết bị MikroTik bị xâm nhập như các “bot” để tiến hành các cuộc tấn công.

2. Router MikroTik và Botnet Meris:

Các thiết bị MikroTik, đặc biệt là các router, có thể trở thành mục tiêu cho các tin tặc nếu chúng không được bảo mật đúng cách. Các lỗ hổng bảo mật trong phần mềm routerOS có thể bị lợi dụng để cài đặt malware và kiểm soát thiết bị từ xa, đồng thời thêm nó vào botnet Meris.

3. Hậu quả của việc bị xâm nhập:

Khi thiết bị của bạn bị xâm nhập và trở thành một phần của botnet, nó có thể được sử dụng để thực hiện các cuộc tấn công DDoS hoặc các hoạt động độc hại khác. Điều này không chỉ làm giảm hiệu suất mạng của bạn, mà còn có thể gây ra trách nhiệm pháp lý.

4. Cách bảo vệ router MikroTik của bạn:

  • Cập nhật Firmware: Một trong những bước quan trọng nhất để bảo vệ router MikroTik của bạn là cập nhật firmware lên phiên bản mới nhất. MikroTik cập nhật firmware của mình đều đặn để khắc phục các lỗ hổng bảo mật.
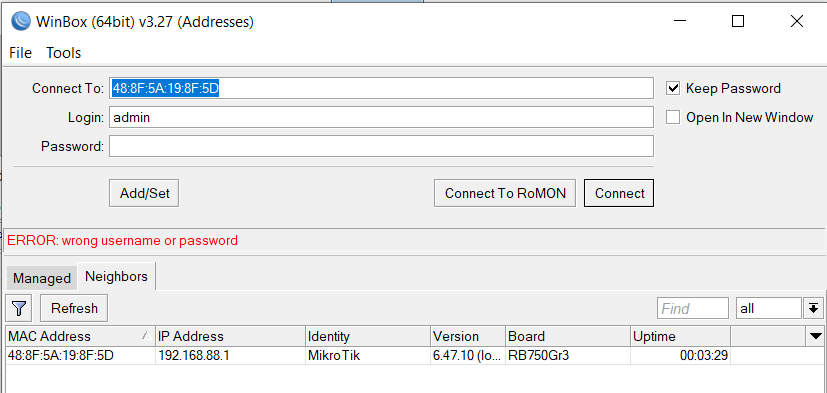
  • Thay đổi Mật khẩu mặc định: Không bao giờ sử dụng mật khẩu mặc định được cung cấp bởi nhà sản xuất. Hãy chắc chắn rằng bạn đã đặt một mật khẩu mạnh và độc đáo cho router của mình.
  • Tắt Dịch vụ không cần thiết: Tắt bất kỳ dịch vụ không cần thiết nào trên router của bạn để giảm bớt các cơ hội bị xâm nhập.
  • Theo dõi Lưu lượng mạng: Sử dụng các công cụ theo dõi lưu lượng mạng để phát hiện bất kỳ hoạt động bất thường nào, điều này có thể giúp bạn phát hiện sớm các vấn đề bảo mật.
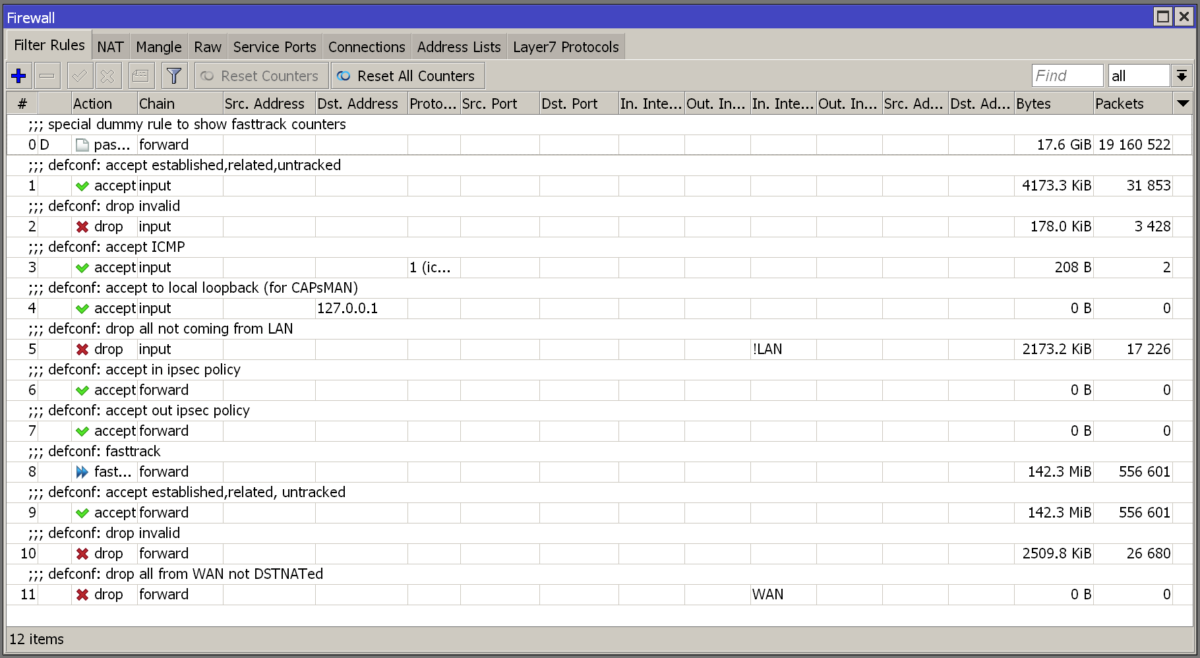
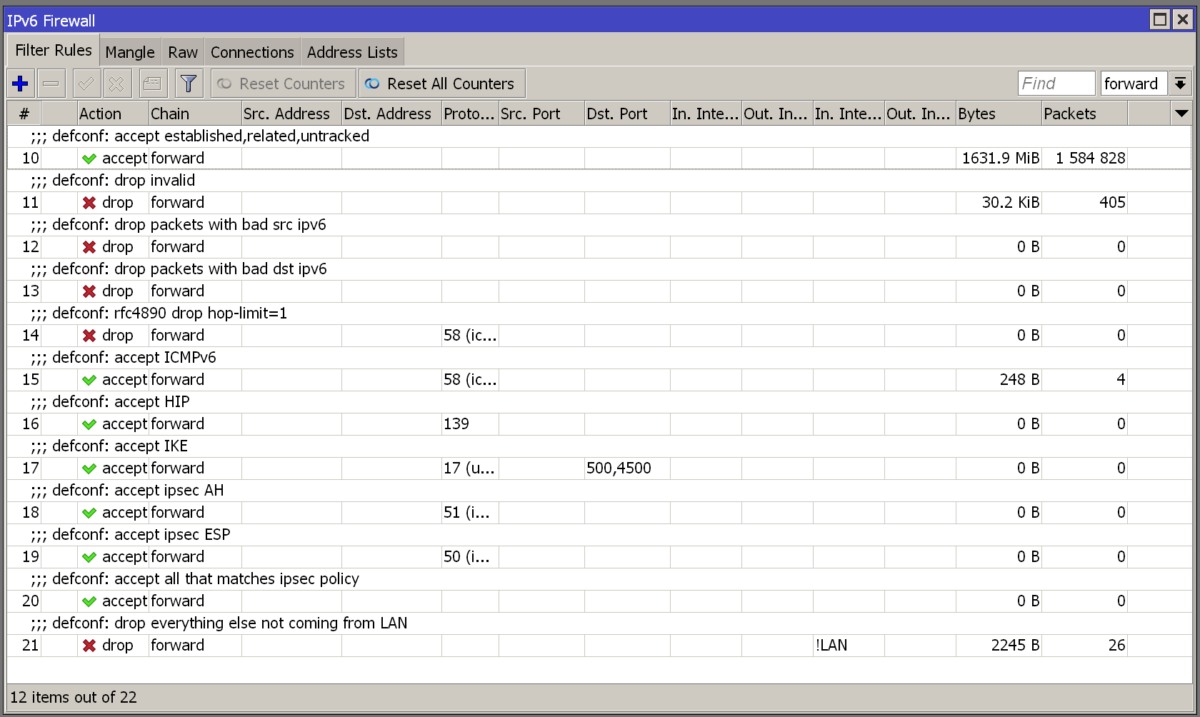
  • Tùy chỉnh Tường lửa (Firewall): Cấu hình đúng cách tường lửa trên router của bạn để ngăn chặn truy cập không được phép và bảo vệ mạng của bạn.

Chúng ta cùng chia sẻ và nâng cao nhận thức về vấn đề bảo mật mạng để xây dựng một cộng đồng mạng an toàn hơn tại Việt Nam.

RouterOS 7 multiwan PPPoE loadbalance script

Last edit 04/01/2022

Please try my RouterOS 7 multiwan PPPoE loadbalance script

Main features: 1) This script allows you to send traffic from special address lists via certain pppoe connection, bypassing the load balance logic (for example your TV should always go only via pppoe-02) 2) This script supports HAIRPIN-NAT 3) This script solves the multiwan issue when you are building outgoing VPN tunnels (openvpn, wireguard, IPSec etc). Please see the pppoe profile section. 4) This script is CPU friendly

In this script I assume you have 2 pppoe WAN links: 1) ether1 with pppoe-01 (FPT) 2) ether2 with pppoe-02 (VNPT)

And 2 LAN bridges: 1) bridge-lan-01 2) bridge-lan-02

Send your feedback to [email protected]

/interface/list/add name=WAN comment="For Internet"
/interface/list/add name=LAN comment="For Local Area Networks"

/interface pppoe-client
add disabled=no interface=ether1 name=pppoe-01 add-default-route=no user=fpt1 password=fpt1
add disabled=no interface=ether2 name=pppoe-02 add-default-route=no user=vnpt1 password=vnpt1

/interface/bridge/
add name=bridge-lan-01 comment=LAN1
add name=bridge-lan-02 comment=LAN2
/interface/bridge/port
add bridge=bridge-lan-01 interface=ether3
add bridge=bridge-lan-01 interface=ether4
add bridge=bridge-lan-01 interface=ether5

/interface/list/member/add interface=ether1 list=WAN comment="Uplink WAN for PPPoE-01"
/interface/list/member/add interface=ether2 list=WAN comment="Uplink WAN for PPPoE-02"
/interface/list/member/add interface=pppoe-01 list=WAN comment=PPPoE-01
/interface/list/member/add interface=pppoe-02 list=WAN comment=PPPoE-02 
/interface/list/member/add interface=bridge-lan-01 list=LAN
/interface/list/member/add interface=bridge-lan-02 list=LAN

/ip/neighbor/discovery-settings/set discover-interface-list=!WAN
/tool/mac-server/set allowed-interface-list=LAN
/tool/mac-server/mac-winbox/set allowed-interface-list=LAN

/ip/firewall/address-list
add address=0.0.0.0/8 comment="\"This\" Network" list=BOGONS
add address=10.0.0.0/8 comment="Private-Use Networks" list=BOGONS
add address=100.64.0.0/10 comment="Shared Address Space. RFC 6598" list=BOGONS
add address=127.0.0.0/8 comment="Loopback" list=BOGONS
add address=169.254.0.0/16 comment="Link Local" list=BOGONS
add address=172.16.0.0/12 comment="Private-Use Networks" list=BOGONS
add address=192.0.0.0/24 comment="IETF Protocol Assignments" list=BOGONS
add address=192.0.2.0/24 comment="TEST-NET-1" list=BOGONS
add address=192.168.0.0/16 comment="Private-Use Networks" list=BOGONS
add address=198.18.0.0/15 comment="Network Interconnect Device Benchmark Testing" list=BOGONS
add address=198.51.100.0/24 comment="TEST-NET-2" list=BOGONS
add address=203.0.113.0/24 comment="TEST-NET-3" list=BOGONS
add address=224.0.0.0/4 comment="Multicast" list=BOGONS
add address=192.88.99.0/24 comment="6to4 Relay Anycast" list=BOGONS
add address=240.0.0.0/4 comment="Reserved for Future Use" list=BOGONS
add address=255.255.255.255 comment="Limited Broadcast" list=BOGONS

/ip/dns/set servers=1.1.1.1,8.8.8.8

/ip/address/add interface=bridge-lan-01 address=192.168.88.1/24 comment="LAN1 IP"
/ip/address/add interface=bridge-lan-02 address=172.16.0.1/23 comment="LAN2 IP"

/routing/rule/add dst-address=192.168.88.0/24 table=main action=lookup comment="to LAN1"
/routing/rule/add dst-address=172.16.0.0/23 table=main action=lookup comment="to LAN2"

/ip/firewall/nat/add action=masquerade chain=srcnat comment="Masquerade WAN (non-ipsec)" ipsec-policy=out,none out-interface-list=WAN
/ip/firewall/nat/add action=src-nat chain=srcnat comment="Hairpin to LAN1" out-interface=bridge-lan-01 src-address=192.168.88.0/24 to-addresses=192.168.88.1
/ip/firewall/nat/add action=src-nat chain=srcnat comment="Hairpin to LAN2" out-interface=bridge-lan-01 src-address=172.16.0.0/23 to-addresses=172.16.0.1

/routing/table/add disabled=no fib name=rtab_pppoe-01
/routing/table/add disabled=no fib name=rtab_pppoe-02

/ip/firewall/mangle/add action=mark-connection chain=prerouting comment="Connmark in from PPPoE-01" \
    connection-mark=no-mark in-interface=pppoe-01 new-connection-mark=connmark_pppoe-01 passthrough=no
/ip/firewall/mangle/add action=mark-connection chain=prerouting comment="Connmark in from PPPoE-02" \
    connection-mark=no-mark in-interface=pppoe-02 new-connection-mark=connmark_pppoe-02 passthrough=no

/ip firewall mangle add action=mark-connection chain=prerouting connection-mark=no-mark \
    comment="Address List via PPPoE-01" dst-address-list=!BOGONS dst-address-type=!local new-connection-mark=connmark_pppoe-01 \
    passthrough=yes src-address-list=Via_PPPoE-01
/ip firewall mangle add action=mark-connection chain=prerouting connection-mark=no-mark \
    comment="Address List via PPPoE-02" dst-address-list=!BOGONS dst-address-type=!local new-connection-mark=connmark_pppoe-02 \
    passthrough=yes src-address-list=Via_PPPoE-02

/ip firewall mangle add action=mark-connection chain=prerouting connection-mark=no-mark \
    comment="LoadBalance transit connections via PPPoE-01" dst-address-list=!BOGONS dst-address-type=!local new-connection-mark=connmark_pppoe-01 \
    passthrough=yes per-connection-classifier=both-addresses-and-ports:2/0
/ip firewall mangle add action=mark-connection chain=prerouting connection-mark=no-mark \
    comment="LoadBalance transit connections via PPPoE-02" dst-address-list=!BOGONS dst-address-type=!local new-connection-mark=connmark_pppoe-02 \
    passthrough=yes per-connection-classifier=both-addresses-and-ports:2/1

/ip/firewall/mangle/add action=mark-routing chain=prerouting \
    comment="Routemark transit out via PPPoE-01" connection-mark=connmark_pppoe-01 \
    dst-address-type=!local in-interface-list=!WAN new-routing-mark=rtab_pppoe-01 passthrough=no
/ip/firewall/mangle/add action=mark-routing chain=prerouting \
    comment="Routemark transit out via PPPoE-02" connection-mark=connmark_pppoe-02 \
    dst-address-type=!local in-interface-list=!WAN new-routing-mark=rtab_pppoe-02 passthrough=no

/ip/firewall/mangle/add action=mark-routing chain=output \
    comment="Routemark local out via PPPoE-01" connection-mark=connmark_pppoe-01 \
    dst-address-type=!local new-routing-mark=rtab_pppoe-01 passthrough=no
/ip/firewall/mangle/add action=mark-routing chain=output \
    comment="Routemark local out via PPPoE-02" connection-mark=connmark_pppoe-02 \
    dst-address-type=!local new-routing-mark=rtab_pppoe-02 passthrough=no

/interface/bridge/add name=bridge-loopback comment="Loopback interface for emergency routing"
/ip/route/add distance=254 gateway=bridge-loopback comment="Emergency route"

/ip/route/add comment="Unmarked via PPPoE-01" distance=1 gateway=pppoe-01
/ip/route/add comment="Unmarked via PPPoE-02" distance=2 gateway=pppoe-02

/ip route add comment="Marked via PPPoE-01 Main" distance=1 gateway=pppoe-01 routing-table=rtab_pppoe-01
/ip route add comment="Marked via PPPoE-01 Backup" distance=2 gateway=pppoe-02 routing-table=rtab_pppoe-01

/ip route add comment="Marked via PPPoE-02 Main" distance=1 gateway=pppoe-02 routing-table=rtab_pppoe-02
/ip route add comment="Marked via PPPoE-02 Backup" distance=2 gateway=pppoe-01 routing-table=rtab_pppoe-02

/ppp profile
add name=profile-pppoe-01 comment="Add/remove route rule for pppoe-01" on-down="/routing/rule/ remove [find comment=\"From PPPoE-01 IP to Inet\"]" on-up=":if [:tobool ([/routing/rule/ find comment=\"From PPPoE-01 IP to \
    Inet\"])] do={\r\
    \n  /routing/rule/ set [find comment=\"From PPPoE-01 IP to Inet\"] \\\r\
    \n    src-address=\$\"local-address\" table=rtab_pppoe-01} else={\r\
    \n  /routing/rule/ add action=lookup comment=\"From PPPoE-01 IP to Inet\" src-address=\$\"local-address\" table=rtab_pppoe-01 }"

/interface/pppoe-client/set pppoe-01 profile=profile-pppoe-01

/ppp profile
add name=profile-pppoe-02  comment="Add/remove route rule for pppoe-02" on-down="/routing/rule/ remove [find comment=\"From PPPoE-02 IP to Inet\"]" on-up=":if [:tobool ([/routing/rule/ find comment=\"From PPPoE-02 IP to \
    Inet\"])] do={\r\
    \n  /routing/rule/ set [find comment=\"From PPPoE-02 IP to Inet\"] \\\r\
    \n    src-address=\$\"local-address\" table=rtab_pppoe-02} else={\r\
    \n  /routing/rule/ add action=lookup comment=\"From PPPoE-02 IP to Inet\" src-address=\$\"local-address\" table=rtab_pppoe-02 }"

/interface/pppoe-client/set pppoe-02 profile=profile-pppoe-02

Inspired by: Vladimir Prislonsky https://habr.com/ru/post/463813/

MikroTik Single-WAN / Dual-LAN PCQ simple queue script example

The example below shows how to setup MikroTik PCQ queues for configurations with multiple LAN (office, guest) using MikroTik PCQ simple queues to equally split the available 100mbit bandwidth across all connected devices in the LAN network.

Ví dụ dưới đây cho thấy cách thiết lập MikroTik PCQ queues cho các cấu hình với WAN đơn và nhiều mạng LAN (văn phòng, mạng khách) bằng cách sử dụng MikroTik PCQ simple queues để chia đều băng thông khả dụng 100mbit trên tất cả các thiết bị được kết nối trong mạng LAN.

/queue simple add dst=pppoe-fpt max-limit=100M/100M name=queue-fpt-master queue=default/default target="" add limit-at=20M/20M max-limit=100M/100M name=queue-fpt-guest parent=queue-fpt-master queue=pcq-upload-default/pcq-download-default target=10.0.0.0/24 add limit-at=80M/80M max-limit=100M/100M name=queue-fpt-office parent=queue-fpt-master priority=4/4 queue=pcq-upload-default/pcq-download-default target=192.168.188.0/24

MikroTik Dual-WAN PCQ simple queue script example (works for load-balancing)

The example below shows how to setup MikroTik PCQ queues for configurations with multiple LAN (office, guest) and multiple WAN (Viettel, FPT) using MikroTik PCQ simple queues to equally split the available bandwidth across all connected devices in the LAN network. Works properly with load-balance configurations.

Ví dụ dưới đây cho thấy cách thiết lập MikroTik PCQ queues cho các cấu hình với nhiều mạng LAN (văn phòng, mạng khách) và nhiều WAN (Viettel, FPT) bằng cách sử dụng MikroTik PCQ simple queues để chia đều băng thông khả dụng trên tất cả các thiết bị được kết nối trong mạng LAN. Hoạt động đúng với cấu hình load-balance.

/queue simple add dst=pppoe-viettel max-limit=60M/60M name=queue-viettel-master queue=default/default target="" add limit-at=50M/50M max-limit=60M/60M name=queue-viettel-office parent=queue-viettel-master priority=4/4 queue=pcq-upload-default/pcq-download-default target=192.168.188.0/24 add limit-at=10M/10M max-limit=60M/60M name=queue-viettel-guest parent=queue-viettel-master queue=pcq-upload-default/pcq-download-default target=10.0.0.0/24 add dst=pppoe-fpt max-limit=100M/100M name=queue-fpt-master queue=default/default target="" add limit-at=20M/20M max-limit=100M/100M name=queue-fpt-guest parent=queue-fpt-master queue=pcq-upload-default/pcq-download-default target=10.0.0.0/24 add limit-at=80M/80M max-limit=100M/100M name=queue-fpt-office parent=queue-fpt-master priority=4/4 queue=pcq-upload-default/pcq-download-default target=192.168.188.0/24

Default firewall for RouterOS v6 and v7

/ip firewall nat add chain=srcnat out-interface-list=WAN ipsec-policy=out,none action=masquerade comment="defconf: masquerade" /ip firewall { filter add chain=input action=accept connection-state=established,related,untracked comment="defconf: accept established,related,untracked" filter add chain=input action=drop connection-state=invalid comment="defconf: drop invalid" filter add chain=input action=accept protocol=icmp comment="defconf: accept ICMP" filter add chain=input action=accept dst-address=127.0.0.1 comment="defconf: accept to local loopback (for CAPsMAN)" filter add chain=input action=drop in-interface-list=!LAN comment="defconf: drop all not coming from LAN" filter add chain=forward action=accept ipsec-policy=in,ipsec comment="defconf: accept in ipsec policy" filter add chain=forward action=accept ipsec-policy=out,ipsec comment="defconf: accept out ipsec policy" filter add chain=forward action=fasttrack-connection connection-state=established,related comment="defconf: fasttrack" filter add chain=forward action=accept connection-state=established,related,untracked comment="defconf: accept established,related, untracked" filter add chain=forward action=drop connection-state=invalid comment="defconf: drop invalid" filter add chain=forward action=drop connection-state=new connection-nat-state=!dstnat in-interface-list=WAN comment="defconf: drop all from WAN not DSTNATed" }

IPv6 default firewall for RouterOS v6 and v7

/ipv6 firewall { address-list add list=bad_ipv6 address=::/128 comment="defconf: unspecified address" address-list add list=bad_ipv6 address=::1 comment="defconf: lo" address-list add list=bad_ipv6 address=fec0::/10 comment="defconf: site-local" address-list add list=bad_ipv6 address=::ffff:0:0/96 comment="defconf: ipv4-mapped" address-list add list=bad_ipv6 address=::/96 comment="defconf: ipv4 compat" address-list add list=bad_ipv6 address=100::/64 comment="defconf: discard only " address-list add list=bad_ipv6 address=2001:db8::/32 comment="defconf: documentation" address-list add list=bad_ipv6 address=2001:10::/28 comment="defconf: ORCHID" address-list add list=bad_ipv6 address=3ffe::/16 comment="defconf: 6bone" filter add chain=input action=accept connection-state=established,related,untracked comment="defconf: accept established,related,untracked" filter add chain=input action=drop connection-state=invalid comment="defconf: drop invalid" filter add chain=input action=accept protocol=icmpv6 comment="defconf: accept ICMPv6" filter add chain=input action=accept protocol=udp port=33434-33534 comment="defconf: accept UDP traceroute" filter add chain=input action=accept protocol=udp dst-port=546 src-address=fe80::/10 comment="defconf: accept DHCPv6-Client prefix delegation." filter add chain=input action=accept protocol=udp dst-port=500,4500 comment="defconf: accept IKE" filter add chain=input action=accept protocol=ipsec-ah comment="defconf: accept ipsec AH" filter add chain=input action=accept protocol=ipsec-esp comment="defconf: accept ipsec ESP" filter add chain=input action=accept ipsec-policy=in,ipsec comment="defconf: accept all that matches ipsec policy" filter add chain=input action=drop in-interface-list=!LAN comment="defconf: drop everything else not coming from LAN" filter add chain=forward action=accept connection-state=established,related,untracked comment="defconf: accept established,related,untracked" filter add chain=forward action=drop connection-state=invalid comment="defconf: drop invalid" filter add chain=forward action=drop src-address-list=bad_ipv6 comment="defconf: drop packets with bad src ipv6" filter add chain=forward action=drop dst-address-list=bad_ipv6 comment="defconf: drop packets with bad dst ipv6" filter add chain=forward action=drop protocol=icmpv6 hop-limit=equal:1 comment="defconf: rfc4890 drop hop-limit=1" filter add chain=forward action=accept protocol=icmpv6 comment="defconf: accept ICMPv6" filter add chain=forward action=accept protocol=139 comment="defconf: accept HIP" filter add chain=forward action=accept protocol=udp dst-port=500,4500 comment="defconf: accept IKE" filter add chain=forward action=accept protocol=ipsec-ah comment="defconf: accept ipsec AH" filter add chain=forward action=accept protocol=ipsec-esp comment="defconf: accept ipsec ESP" filter add chain=forward action=accept ipsec-policy=in,ipsec comment="defconf: accept all that matches ipsec policy" filter add chain=forward action=drop in-interface-list=!LAN comment="defconf: drop everything else not coming from LAN" }

How to reset MikroTik RouterBOARD admin password without resetting the configuration

Forgot the MikroTik RouterBOARD password? No problem, lets try to reset the admin password WITHOUT resetting the all configuration.

This trick works only with RouterBOARDs produced before mid 2018 (with factory RouterOS 6.42.12 and older)

Tip: try this trick on a test device before resetting in real

RouterOS versions 6.42.x and below had weak winbox authentication with insecure plain-text internal storage. This legacy storage was replaced by modern secure storage starting from version 6.43. RouterOS versions 6.43 and 6.44 had a transitional dual credentials storage. The system admin password was stored in legacy and modern storage together. After upgrading to version 6.45 and newer the legacy storage was wiped and removed from the system. The legacy storage admin password is reset to empty after 6.45 installation. We can use netinstall tool to replace RouterOS 6.45+ with RouterOS 6.42 to ignore the modern storage and use legacy. As soon as our legacy storage has empty admin password – we can access the system.

Let’s go step-by-step to make it!